Here is a primer on what your camera files are and what you should know before pulling your hair out in the editing process when your computer stutters and grinds to a halt when pressing play.
Resolution and video size explained
Firstly, cameras today record video in 1080p widescreen video as default. 1080p refers to the resolution (number of pixels in the video) being 1080 pixels high (vertical) and 1920 pixels wide (a 16:9 ratio). 4K video is 3840 pixels wide and 2160 pixels high resulting in 4 times higher resolution.
The “p” in the term 1080p stands for “progressive” which means that the entire image is displayed in each frame as opposed to the older and not so often used “interlaced” mode, something you most likely won’t be worrying about.

Size comparison between 1080p and 4K video
Recording 1080p video requires a lot of disk space – 4K video even more so. To save space on your memory card the camera saves the video using a compressed video format. The .h264 encoder is commonly used to compress high quality video so that your 1080p or 4K videos on your camera card consumes less space – almost 10 times less.
Now, here is the takeaway.
When you play a compressed video taken with your camera, the computer or camera needs to uncompress the movie to show it to you.
This requires a lot of brain power for the camera/computer to do. An uncompressed or much-less compressed movie file format is much easier to play back and use for editing for a computer. Editing compressed h264-files straight can be difficult to work with. The computer gets slow and laggy, it is tedious to work with the timeline, scrub-playing and using effects takes forever.
Comparing h264 and CineForm playback
The right side displays how much less is needed to play back a editing-friendly format such as CineForm HD (installed for free when you install GoPro Studio on your computer). Almost half the power! The less compressed a file is, the easier it is to play back.
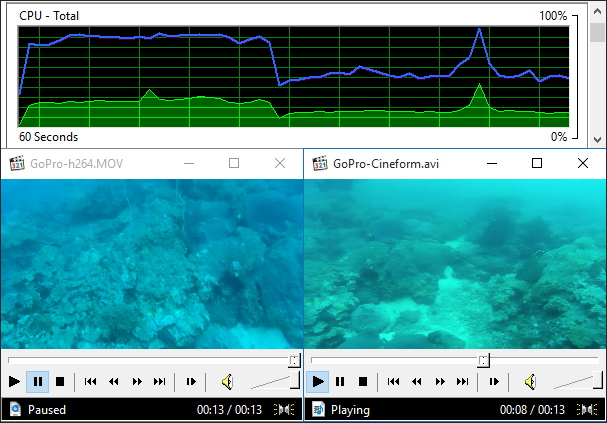
Left side is a dive video compressed with h264. On the right is the same file saved as CineForm HD. Incredible difference.
Converting video for editing purposes
Hence it is important that you download all the files from your camera card to your computer hard drive and then convert (also called transcode) them into an editing-friendly format such as CineForm.
Other recommended file formats for editing purposes are Apple ProRes 422, DNxHD and GrassValley HQX (some only available for mac users).
In some editing applications such as Final Cut Pro, these types of files are called “optimized media” and are meant for editing. Be aware that you will need lots of hard drive space for these files, they will increase the file size by up to 10x.
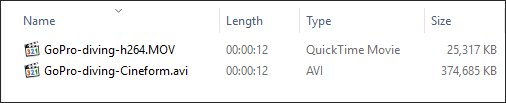
Same video clip saved as h264 and Cuneiform respectively. More than 10x disk space savings.
How to convert/transcode the videos for editing
There are many ways to do this. If you use GoPro Studio on your computer to do your editing, the program takes care of it for you. You import the videos, you go through them, select your start/end points on each clip and it takes you to step 2 where it converts it for editing for you. GoPro owns the the CineForm codec so it is built into the application itself. If you use Final Cut Pro it allows you to import and make optimized edit-friendly files straight away, just tick the box.
For those of you doing things manually like myself, using Sony Vegas, Pinnacle Studio, Windows Movie maker etc, I recommend using a batch-conversion utility to create your edit-friendly files first outside your video editing application. MPEG Streamclip is one of the best ones to use for this purpose, it is free and handle the job beautifully.
Performing the conversion to Cineform HD
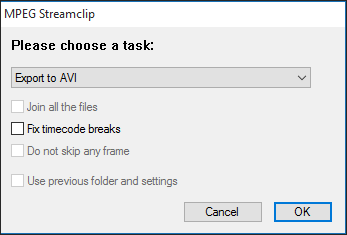
Open the MPEG Streamclip application and open the “Batch List” from the List-menu. Click “Add Files” on the bottom right and find the files downloaded from your camera. Choose “Export to AVI” in the dialog that follows. If you plan to export to Apple ProRes422 on your Mac for editing, select “Export to Quicktime” in this dialog instead.
Checking the correct settings
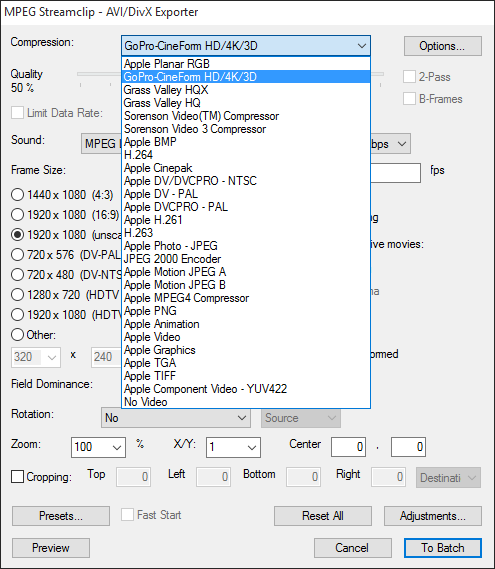
When you have selected your destination folder you will be presented with a rather intimidating screen, but don’t worry, it is easy enough. In the “compression” dropdown list, choose your preferred compression format, in this case we are using “GoPro-Cineform HD/4K/3D”. The rest of the settings are already set to correctly, just ensure that the resolution is the set to (unscaled).
Begin editing with the new files
When the process is completed, you now have a set of Cineform-converted files that you can use for editing your movie in your preferred editor. Fire up the editor and import and use the new files. Playback and effects should be running smoothly without lagging. If you are using 4K video material and the computer still has trouble performing, you need to look into creating Proxy-files which we will look at in the next lesson.
Exporting to Youtube or HD TV playback
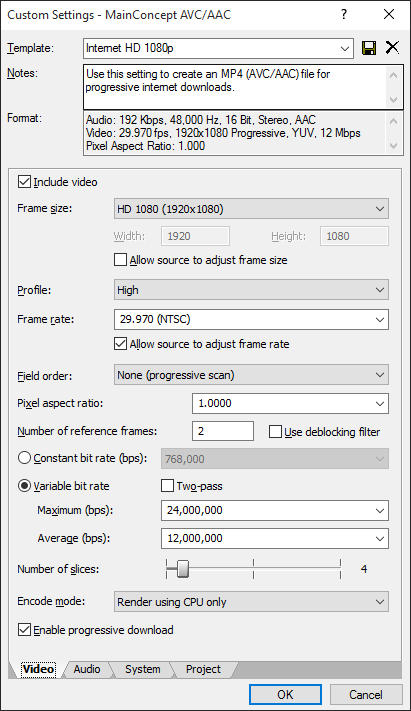
When you are done editing your movie, you want to export the movie to a compressed format again to preserve disk space and distribute it online, preferably you should use h264 for video and aac for audio. Find the export/render settings in your editor and select .mp4 or .mkv file format. In Sony Vegas, the one to use is called “MainConcept AVC/AAC”. Then choose 1080p resolution, h264 for video compression and aac for audio.
Quality settings depend on where you need to export to. Higher quality take up more space, take more time to complete but also look better, so that decision is up to you. Let me know if you need recommendations.
Here are my settings for 1080p export for Youtube. (Not 4K)
Good luck with your editing, hope this helped. Do let me know what you think of these articles and whether you want more tutorials of this kind.